
AWS VPN or Amazon Web Services Virtual Private Network is a service of Amazon that allows the user to establish a secure and private connection between the data center and VPC on AWS. The AWS service is divided into two services and by using these two, you can connect yourself or the users to Amazon Virtual Private Cloud.
Undoubtedly, AWS provides a great service. If you are willing to use the AWS VPC service then you must need to use the AWS VPN. However, it’s a very lengthy process but can be done easily if you have enough idea about how to use the AWS VPN.
Today we are here to guide you on how to use the AWS VPN. Be with us till the end and establish a private and secure connection with the AWS VPC.
Procedure to Use Amazon Web Services VPN
As we have mentioned earlier, the AWS service is divided into two other services; one is AWS Client VPN, and the other one is AWS Site-to-Site VPN.
Here we have provided the procedure for both AWS Client and Site-to-Site VPN.
(A) Steps for Configuring AWS Client VPN for Using
To configure AWS Client VPN for use, you will need to follow 8 steps. Make sure you have followed and applied each of them, otherwise, you won’t be able to use AWS Client VPN. Here are the steps –
Step 1: Create Certificates And Keys For Both The Server And The Client
The first thing you will need is a certificate and key for both server and the client. It will be used for performing authentication between clients and the VPN endpoint. For this, you need to create a certificate and key with the help of OpenVPN easy-rsa utility. Here are the steps,
- Go to EasyRSA releases page and look for the ZIP file that is compatible with your OS version. Download and extract the file.
- Now, launch Command Prompt and type the command C:\Program Files\EasyRSA-3.x> .\EasyRSA-Start.bat and press enter to open the EasyRSA 3 shell.
- Next, type # ./easyrsa init-pki and press enter to initialize a new PKI environment.
- After that, it’s time to create a new Certificate Authority. Run this command # ./easyrsa build-ca nopass and follow the ptompts.
- Once the CA is created, run this command, # ./easyrsa build-server-full server nopass to generate the server certificate and key.
- After generating the Server certificate and key, run this command to create the client certificate and key; # ./easyrsa build-client-full client1.domain.tld nopass
- Now, run this command to exit the EasyRSA 3 shell; # exit
Now, import the certificate to the AWS Certificate Manager and specify the creating time of the Client VPN endpoint.
Step 2: Setup an Endpoint for the Client VPN
Without an endpoint, you be able to enable client VPN sessions. With the endpoint, you can manage the client VPN sessions as well. Here are the steps that you will need to follow –
- Launch your browser and go to the Amazon VPC console.
- Now, select Client VPN Endpoints from the Navigation pane and choose Create Client VPN endpoint.
- Now, specify an IP address range for Client IPv4 CIDR. Remember that, the address range must stay within this range; /22 < Address Range < /12 CIDR block size.
- After that choose the ARN of the server certificate in the Server certificate ARN section.
- Now, select Use mutual authentication under the Authentication option and choose the ARN of the certificate for Client certificate ARN.
- Lastly, select Create Client VPN endpoint.
Step 3: Associate a Target Network with the Client VPN Endpoint
Now, you will need to associate a target network with the endpoint to allow the clients to create a VPN session.
- Back to the Navigation pane, and select Client VPN Endpoints.
- After that, select the created endpoint and then select; Target network associations and Associate target network.
- Now, for VPC, select the VPC that contains the target network as a subnet.
- Next, choose the subnet to associate with the endpoint.
- Then, select Associate target network and wait until the authorization rule allows it.
Step 4: Create a VPC Authorization Rule
By now, you have created the half route for accessing the VPC and now you will need to create an authorization rule for accessing the VPC properly.
- In the Client VPN Endpoints, choose the VPN endpoint to which you are willing to add the rule.
- After that, click on Authorization rules > Add authorization rule.
- Now, provide the CIDR of the network and by doing so, you will be able to enable access to the destination network.
- Next, click on Allow access to all users, and lastly, click on Add authorization rule.
Step 5: Allow Internet Access
After completing the 4 steps, now it’s time to allow internet access.
- Inside the Client VPN endpoints, choose the endpoint that you have already created. Now, click on Route Table > Create Route.
- Enter 0.0.0.0/0 for the route destination and specify the ID of the subnet for Subnet ID for target network association. Now, click on Create Route.
- After that, click on Authorization rules > Add authorization rule.
- Now, for enabling access to the Destination network, enter 0.0.0.0/0 and then click on Allow access to all users. Lastly, click on Add authorization rule.
Step 6: Verify The Requirements Of The Security Group
While creating the endpoint, the default security group for VPC was applied by default. To make sure whether the security group was applied properly or not, verify the following requirement.
- Check whether the subnet is allowing outbound traffic to the internet or not. To do so, include an outbound rule that enables all traffic to 0.0.0.0/0.
- Check whether the rule of the security groups in VPC is applied to the endpoint.
Step 7: Download Endpoint Configuration for the Client VPN
After completing all of the 6 steps, we are at the End Game. Now, you will need to download and prepare the endpoint configuration file of the client VPN.
- Inside Client VPN Endpoints, choose the created Client VPN endpoint and click on Download client configuration.
- Now locate the client certificate and key in the cloned Open VPN easy-rsa. Next, copy them.
- After that, open the configuration file and add the following tags and the certificate and key elements between the tags.
<cert>
Contents of client certificate (.crt) file
</cert>
<key>
Contents of private key (.key) file
</key>
- Next, inside the text file, look for the line that contains the Client VPN endpoint DNS name. Now, modified the DNS name by adding a random string before the DNS name. For example, if the line says cvpn DNS.xyz then after modifying, it will be random string.cvpn DNS.xyz.
- Lastly, save the changes in the Client VPN endpoint configuration file.
Step 8: Connect to the Client VPN Endpoint
After completing all of the 7 steps, now you will be able to use your client VPN. From now, you can connect your client application to the client VPN and get access to the VPC.
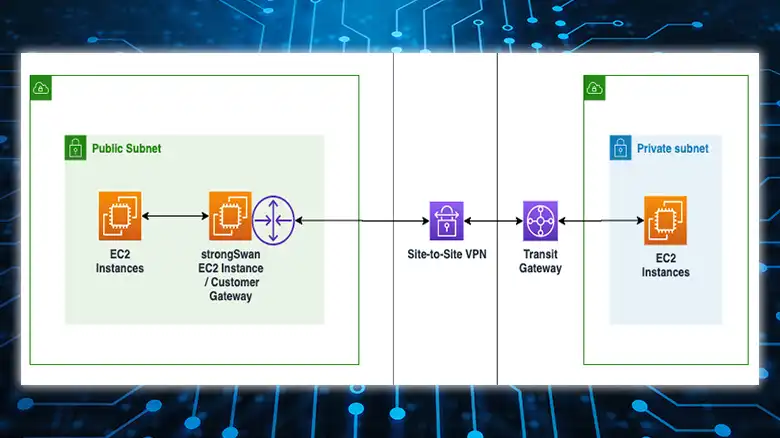
(B) Steps for Configuring AWS Site-to-Site VPN for Using
If you are willing to use AWS site-to-site VPN at your workspace instead of client VPN then you will need to follow the 6 steps below. Here are the steps.
Step 1: Establish a Customer Gateway
At the initial stage, you will need to create a customer gateway. With this, AWS will be able to get the information of the customer gateway device or software.
- Go to the Amazon VPC console and then navigate to Customer Gateways.
- Now, for your customer gateway, provide a Border Gateway Protocol Autonomous System Number.
- Next, click on Create customer gateway, and create it.
Step 2: Create a Target Gateway on the AWS Side of the Connection
By creating the target gateway on the AWS side of the connection, you will be able to establish a VPN connection between the on-premises network and VPC. Here are the steps that you will need to follow.
- Inside Virtual private gateways, click on Create virtual private gateway.
- Inside the Create virtual private gateway, you can keep the default selection or Amazon default ASN for Autonomous System Number. If you want to have Custom ASN then click on Custom ASN and enter your desired value. On an important note, if you are using a 16-bit ASN then make sure the value stays within this range of 64512 < Your Value < 65534. And for 32-bit, 4200000000 < Your Value < 4294967294.
- Now, select Create virtual private gateway and then select the created virtual private gateway. Now, click on Actions > Attach to VPC.
- After that, choose your VPC and then click on Attach to VPC option.
Step 3: Configure Route Table
After creating the target gateway, you will need to configure the routing table. Without it, your VPC won’t be able to reach your customer gateway. By enabling router propagation, the route table will automatically propagate the site-to-site VPN route.
- In the Amazon VPC console, click on Route tables.
- Now, look for the route table that is connected with the subnet. Select it.
- Now, click on the Route Propagation tab and choose Edit route propagation. Inside Edit route propagation, select the created virtual private gateway.
- Nos, click on Save.
If you want to disable the route propagation, Route propagation > Edit route propagation > uncheck or clear the Propagate check box > Save.
Step 4: Update Security Group Rules to Enable Access
You will need to update security group rules to allow VPC from your network. By updating this, the inbound SSH, RDP, and ICMP access will be enabled.
- To do so, in the Navigation Pane, click on Security Groups.
- Choose the default security group.
- Now, navigate to the Inbound Rules tab and click on Edit inbound rules.
- Next, add the rules to enable the aforementioned access from your network.
- Lastly, click on Save Rules to save the changes.
Step 5: Create a VPN Connection
Now, it’s time to create a VPN connection. By using a created customer gateway and virtual private gateway, you can create it.
- Navigate to Site-to-Site VPN connections from the Navigation pane.
- Next, click on Create VPN connection.
- After that, select Virtual Private Gateway in the Target Gateway type section. After selecting, choose the created virtual gateway which was created in step 2.
- Now, for Customer gateway, click on Existing and choose the created Customer gateway.
- If your customer gateway is compatible with BGP (Border Gateway Protocol) then choose Dynamic or otherwise choose Static. Here, for Static IP Prefixes, you will need to specify each IP prefix for the private network.
- In the Outside IP address type, choose Publiclpv4.
- Lastly, click on Create VPN Connection.
Step 6: Download the Configuration File for Configuring the Customer Gateway Device
Once the VPN connection is created, you will need to download the configuration file. Without it, you won’t be able to configure the customer gateway device.
- Navigate to Site-to-Site VPN connections from the Amazon VPC console’s navigation pane.
- Now, select your VPN connection and click on Download configuration.
- On the next window, select the appropriate Vendor, Platform, Software, and IKE version for your customer gateway device. [Note: Choose Generic if you couldn’t find your device in the list].
- Lastly, click on Download.
Now, wait till the file is downloaded properly. After that, use this to configure the customer device gateway.
Conclusion
Lastly, if you are using AWS service for the first time then it will take a lot of time to set up the VPN for your using purpose. Undoubtedly, it’s a very long process but the process isn’t that hard. Follow the steps properly and enjoy AWS VPN at your workspace as well as with your clients!

![Read more about the article [Explained] Does Office VPN Detect Location?](https://vpnaware.com/wp-content/uploads/2023/03/Does-Office-VPN-Detect-Location-300x168.webp)